大疆DJI_Payload_SDK_M3TD无人机捣鼓
最近捣鼓了大疆 DJI的Payload SDK,大疆其实已经提供了非常详细的部署文档可供参考,在Payload SDK中,推荐的硬件是Jetson Nano和树莓派 4B。
系统安装
我这里使用的硬件是Jetson Orin Nano 4G,底板不是官方的,是淘宝购入的。直接从英伟达的官网可以下载:SDK Manager | NVIDIA Developer,安装最新版本的系统,但是注意JetPack的版本和安装时所用的主机的版本有对应关系,比如说:此处我需要安装的版本是JetPack 6.1.x or higher,那Ubuntu就在22.04。JetPack 5.x等旧版本,没有测试过,但是感觉兼容性可能没有那么好。

直接连接跳线,并插入USB进入烧写模式。
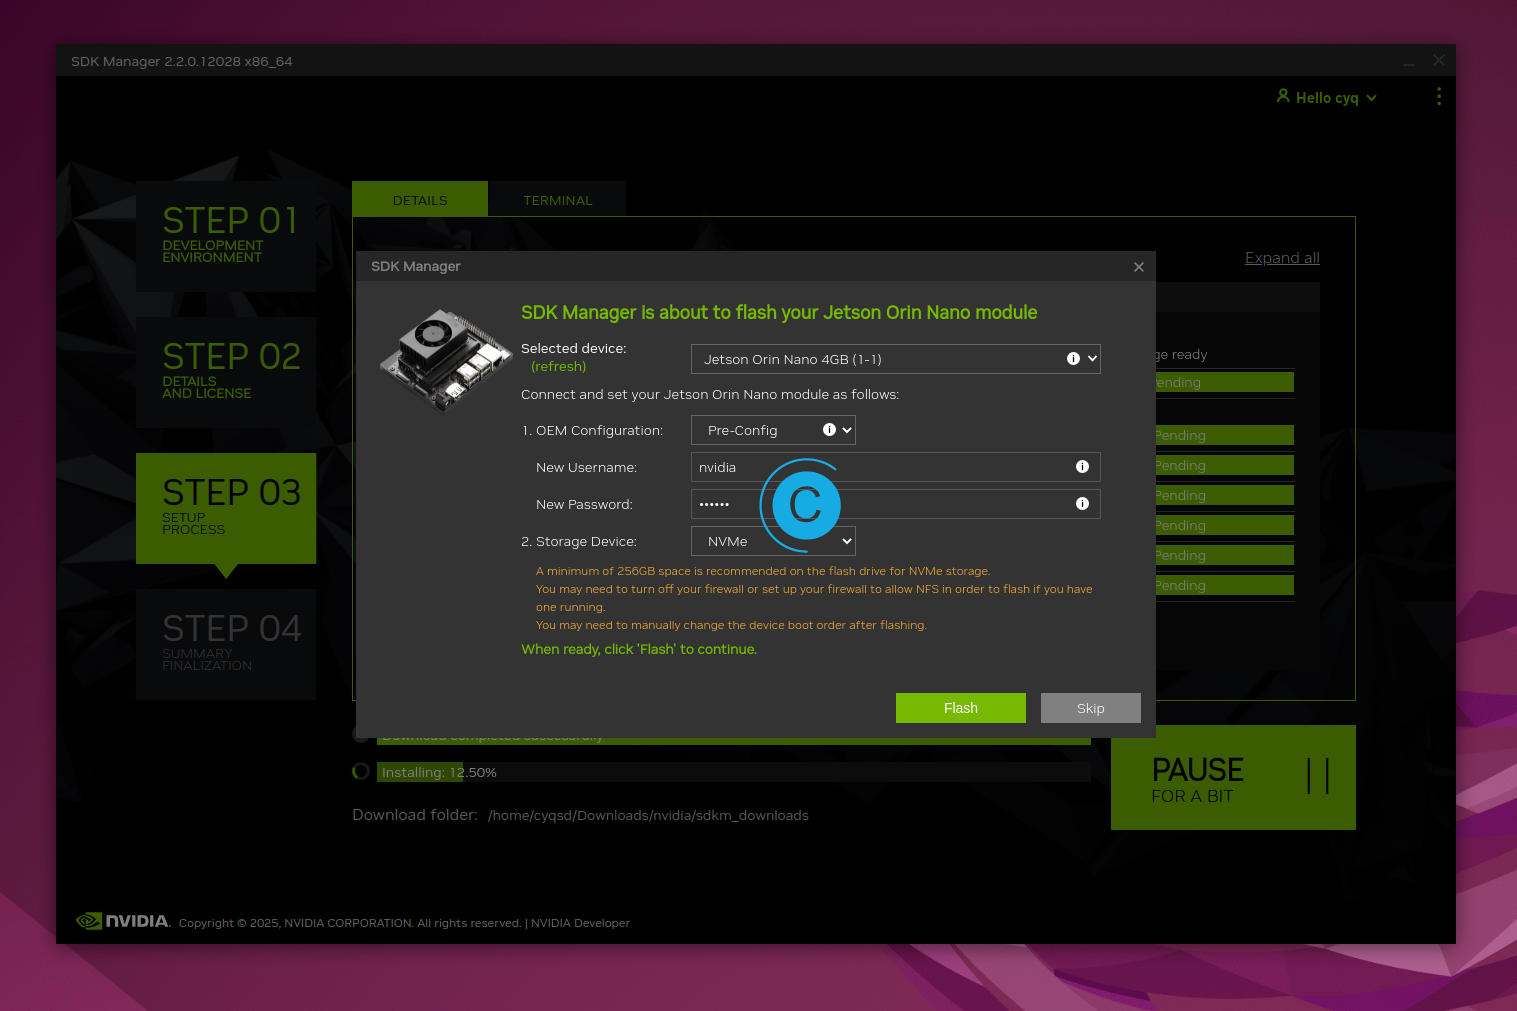
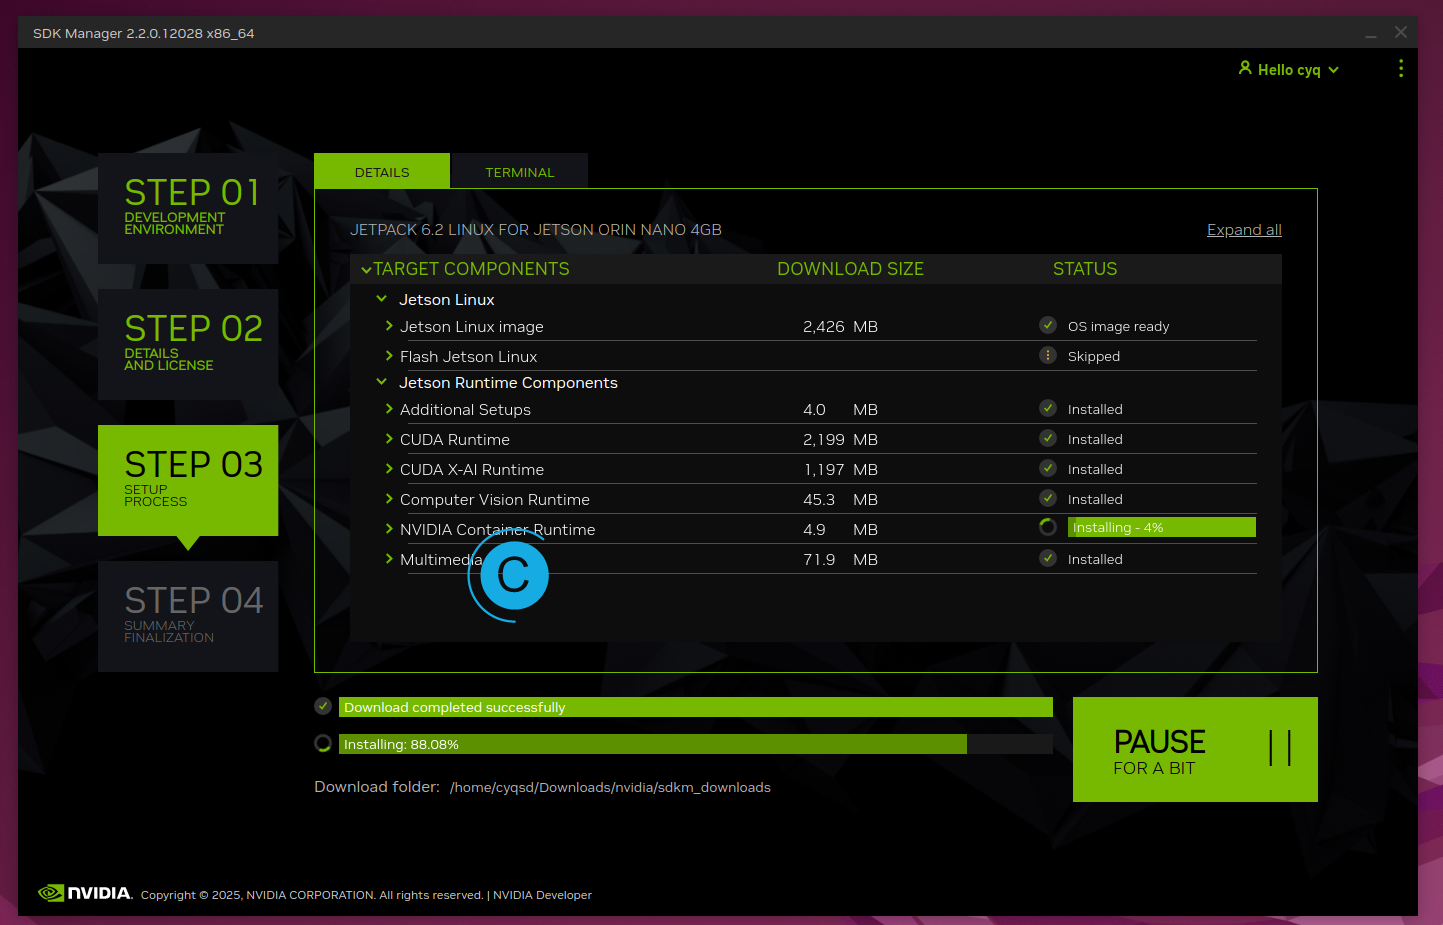
系统外加一堆CUDA运行时,都勾选安装上即可。
设备连接
设备的接线连接,文档中给出了详细的连接图:

这是大疆m350的图,实际使用时,我使用的是m3td位置稍有不同,主要是得看清楚是E-Port接口,不是E-Port Lite接口,具体也看文档:标准硬件接口介绍 Payload SDK。
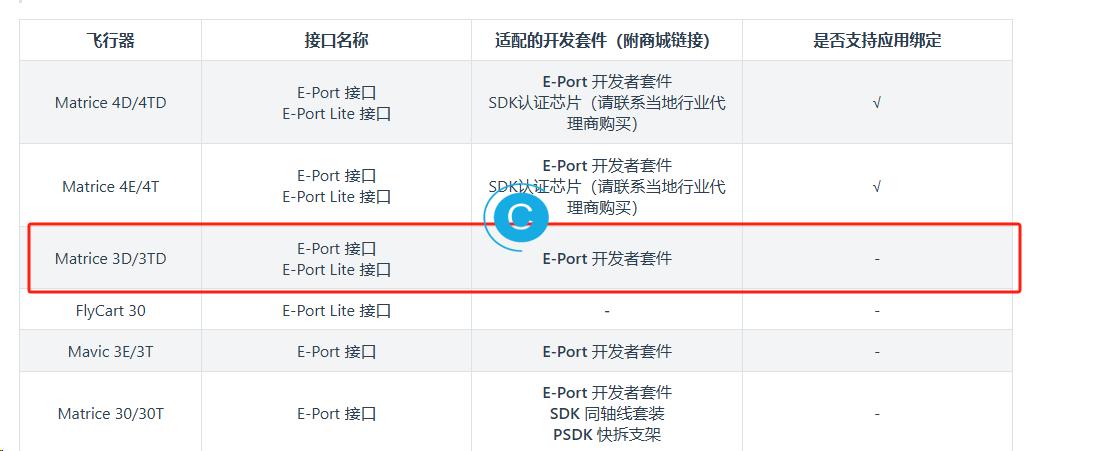
需要的开发套件,也是E-Port开发套件,不支持应用绑定。
并且m3td只支持使用USB连接,不支持网卡连接。
因为你自己的开发板和E-Port开发套件连接时是:你自己的开发板作为从机(device),E-Port开发套件作为主机(host),所以必须使用type-c转USB-A母座的OTG线。另外一段是USB-A转type-c,来连接。一般情况下不能type-c转type-c。
Matrice 3D/3TD 设备连接 Payload SDK
此处引用官方文档中一段:

安装环境准备
官方文档上,指定需要安装以下内容(直接搬运了官方教程):
/* 更新软件仓库 */
sudo apt-get update
sudo apt-get upgrade
sudo apt-get install automake
sudo apt-get install libaio-dev

/* 从 https://opus-codec.org/ 上下载 opus-1.3.1 源码,并进行安装 */
# https://archive.mozilla.org/pub/opus/opus-1.3.1.tar.gz
tar -xzvf opus-1.3.1.tar.gz
cd opus-1.3.1/
autoreconf  -f  -i
./configure
make -j8
sudo make install

/* 从 GitHub 下载并安装 FFmpeg 4.3 源码 */
# https://github.com/FFmpeg/FFmpeg/releases/tag/n4.3.2
tar -zxvf ffmpeg-4.3.2.tar.gz
./configure --enable-shared
make && make install

/* 检查 OpenCV 是否安装 */
opencv_version
/* 安装 libusb */
sudo apt-get install libusb-1.0-0-dev
/* 安装 cmake */
sudo apt-get install cmake
下面是安装步骤:
dongguan@ubuntu:~/Project$ wget https://archive.mozilla.org/pub/opus/opus-1.3.1.tar.gz
--2025-05-15 14:36:59--  https://archive.mozilla.org/pub/opus/opus-1.3.1.tar.gz
Connecting to 192.168.88.12:10809... connected.
Proxy request sent, awaiting response... 200 OK
Length: 1040054 (1016K) [application/x-tar]
Saving to: ‘opus-1.3.1.tar.gz’

opus-1.3.1.tar.gz                         100%[====================================================================================>]   1016K  1.95MB/s    in 0.5s

2025-05-15 14:37:00 (1.95 MB/s) - ‘opus-1.3.1.tar.gz’ saved [1040054/1040054]

dongguan@ubuntu:~/Project$ tar -xzvf opus-1.3.1.tar.gz

dongguan@ubuntu:~/Project/opus-1.3.1$ autoreconf  -f  -i
libtoolize: putting auxiliary files in '.'.
libtoolize: copying file './ltmain.sh'
libtoolize: putting macros in AC_CONFIG_MACRO_DIRS, 'm4'.
libtoolize: copying file 'm4/libtool.m4'
libtoolize: copying file 'm4/ltoptions.m4'
libtoolize: copying file 'm4/ltsugar.m4'
libtoolize: copying file 'm4/ltversion.m4'
libtoolize: copying file 'm4/lt~obsolete.m4'
--- 省略 ---
config.status: creating celt/arm/armopts.s
config.status: creating doc/Makefile
config.status: creating doc/Doxyfile
config.status: creating config.h
config.status: executing depfiles commands
config.status: executing libtool commands
configure:
------------------------------------------------------------------------
  opus 1.3.1:  Automatic configuration OK.

    Compiler support:

      C99 var arrays: ................ yes
      C99 lrintf: .................... yes
      Use alloca: .................... no (using var arrays)

    General configuration:

      Floating point support: ........ yes
      Fast float approximations: ..... no
      Fixed point debugging: ......... no
      Inline Assembly Optimizations: . No inline ASM for your platform, please send patches
      External Assembly Optimizations:
      Intrinsics Optimizations: ...... ARM (NEON) (NEON Aarch64)
      Run-time CPU detection: ........ no
      Custom modes: .................. no
      Assertion checking: ............ no
      Hardening: ..................... yes
      Fuzzing: ....................... no
      Check ASM: ..................... no

      API documentation: ............. yes
      Extra programs: ................ yes
------------------------------------------------------------------------

 Type "make; make install" to compile and install
 Type "make check" to run the test suite

dongguan@ubuntu:~/Project/opus-1.3.1$ make -j8

dongguan@ubuntu:~/Project/opus-1.3.1$ sudo make install
make  install-recursive
make[1]: Entering directory '/home/dongguan/Project/opus-1.3.1'
make[2]: Entering directory '/home/dongguan/Project/opus-1.3.1'
make[3]: Entering directory '/home/dongguan/Project/opus-1.3.1/doc'
make[3]: Nothing to be done for 'all'.
make[3]: Leaving directory '/home/dongguan/Project/opus-1.3.1/doc'
make[3]: Entering directory '/home/dongguan/Project/opus-1.3.1'
 /usr/bin/mkdir -p '/usr/local/lib'
 /bin/bash ./libtool   --mode=install /usr/bin/install -c   libopus.la '/usr/local/lib'
libtool: install: /usr/bin/install -c .libs/libopus.so.0.8.0 /usr/local/lib/libopus.so.0.8.0
libtool: install: (cd /usr/local/lib && { ln -s -f libopus.so.0.8.0 libopus.so.0 || { rm -f libopus.so.0 && ln -s libopus.so.0.8.0 libopus.so.0; }; })
libtool: install: (cd /usr/local/lib && { ln -s -f libopus.so.0.8.0 libopus.so || { rm -f libopus.so && ln -s libopus.so.0.8.0 libopus.so; }; })
libtool: install: /usr/bin/install -c .libs/libopus.lai /usr/local/lib/libopus.la
libtool: install: /usr/bin/install -c .libs/libopus.a /usr/local/lib/libopus.a
libtool: install: chmod 644 /usr/local/lib/libopus.a
libtool: install: ranlib /usr/local/lib/libopus.a
libtool: finish: PATH="/usr/local/sbin:/usr/local/bin:/usr/sbin:/usr/bin:/sbin:/bin:/snap/bin:/sbin" ldconfig -n /usr/local/lib
----------------------------------------------------------------------
Libraries have been installed in:
   /usr/local/lib

If you ever happen to want to link against installed libraries
in a given directory, LIBDIR, you must either use libtool, and
specify the full pathname of the library, or use the '-LLIBDIR'
flag during linking and do at least one of the following:
   - add LIBDIR to the 'LD_LIBRARY_PATH' environment variable
     during execution
   - add LIBDIR to the 'LD_RUN_PATH' environment variable
     during linking
   - use the '-Wl,-rpath -Wl,LIBDIR' linker flag
   - have your system administrator add LIBDIR to '/etc/ld.so.conf'

See any operating system documentation about shared libraries for
more information, such as the ld(1) and ld.so(8) manual pages.
----------------------------------------------------------------------
make[4]: Entering directory '/home/dongguan/Project/opus-1.3.1/doc'
make[5]: Entering directory '/home/dongguan/Project/opus-1.3.1/doc'
make[5]: Nothing to be done for 'install-exec-am'.
make[5]: Nothing to be done for 'install-data-am'.
make[5]: Leaving directory '/home/dongguan/Project/opus-1.3.1/doc'
make[4]: Leaving directory '/home/dongguan/Project/opus-1.3.1/doc'
 /usr/bin/mkdir -p '/usr/local/share/aclocal'
 /usr/bin/install -c -m 644 opus.m4 '/usr/local/share/aclocal'
 /usr/bin/mkdir -p '/usr/local/lib/pkgconfig'
 /usr/bin/install -c -m 644 opus.pc '/usr/local/lib/pkgconfig'
 /usr/bin/mkdir -p '/usr/local/include/opus'
 /usr/bin/install -c -m 644 include/opus.h include/opus_multistream.h include/opus_types.h include/opus_defines.h include/opus_projection.h '/usr/local/include/opus'
make[3]: Leaving directory '/home/dongguan/Project/opus-1.3.1'
make[2]: Leaving directory '/home/dongguan/Project/opus-1.3.1'
make[1]: Leaving directory '/home/dongguan/Project/opus-1.3.1'
dongguan@ubuntu:~/Project/opus-1.3.1$

dongguan@ubuntu:~/Project$ cd FFmpeg-n4.3.2
dongguan@ubuntu:~/Project/FFmpeg-n4.3.2$ ./configure --enable-shared
install prefix            /usr/local
source path               .
C compiler                gcc
C library                 glibc
ARCH                      aarch64 (generic)
big-endian                no
runtime cpu detection     yes
NEON enabled              yes
VFP enabled               yes
debug symbols             yes
strip symbols             yes
optimize for size         no
optimizations             yes
static                    yes
shared                    yes
postprocessing support    no
network support           yes
threading support         pthreads
safe bitstream reader     yes
texi2html enabled         no
perl enabled              yes
pod2man enabled           yes
makeinfo enabled          no
makeinfo supports HTML    no

External libraries:
alsa                    iconv                   libxcb                  lzma                    zlib

External libraries providing hardware acceleration:
v4l2_m2m

Libraries:
avcodec                 avfilter                avutil                  swscale
avdevice                avformat                swresample

Programs:
ffmpeg                  ffprobe

Enabled decoders:
aac                     atrac3pal               flashsv                 mp3float                pgssub                  truemotion2rt
aac_fixed               atrac9                  flashsv2                mp3on4                  pictor                  truespeech
aac_latm                aura                    flic                    mp3on4float             pixlet                  tscc
--- 省略 ---
POD     doc/libavfilter.pod
MAN     doc/ffprobe.1
MAN     doc/ffmpeg-all.1
MAN     doc/ffprobe-all.1
MAN     doc/ffmpeg-utils.1
MAN     doc/ffmpeg-scaler.1
MAN     doc/ffmpeg-resampler.1
MAN     doc/ffmpeg-codecs.1
MAN     doc/ffmpeg-bitstream-filters.1
MAN     doc/ffmpeg-formats.1
MAN     doc/ffmpeg-protocols.1
MAN     doc/ffmpeg-devices.1
MAN     doc/ffmpeg-filters.1
MAN     doc/libavutil.3
MAN     doc/libswscale.3
MAN     doc/libswresample.3
MAN     doc/libavcodec.3
MAN     doc/libavformat.3
MAN     doc/libavdevice.3
MAN     doc/libavfilter.3
LD      libswscale/libswscale.so.5
GEN     libavcodec/libavcodec.ver
LD      libswresample/libswresample.so.3
AR      libavcodec/libavcodec.a
LD      libavcodec/libavcodec.so.58
LD      libavformat/libavformat.so.58
LD      libavfilter/libavfilter.so.7
LD      libavdevice/libavdevice.so.58
LD      ffmpeg_g
LD      ffprobe_g
STRIP   ffprobe
STRIP   ffmpeg
dongguan@ubuntu:~/Project/FFmpeg-n4.3.2$


dongguan@ubuntu:~/Project/FFmpeg-n4.3.2$ sudo make install
INSTALL libavdevice/libavdevice.a
INSTALL libavdevice/libavdevice.so
STRIP   install-libavdevice-shared
INSTALL libavfilter/libavfilter.a
INSTALL libavfilter/libavfilter.so
STRIP   install-libavfilter-shared
INSTALL libavformat/libavformat.a
INSTALL libavformat/libavformat.so
STRIP   install-libavformat-shared
INSTALL libavcodec/libavcodec.a
INSTALL libavcodec/libavcodec.so
STRIP   install-libavcodec-shared
INSTALL libswresample/libswresample.a
INSTALL libswresample/libswresample.so
STRIP   install-libswresample-shared
INSTALL libswscale/libswscale.a
INSTALL libswscale/libswscale.so
STRIP   install-libswscale-shared
INSTALL libavutil/libavutil.a
INSTALL libavutil/libavutil.so
STRIP   install-libavutil-shared
INSTALL doc/ffmpeg.1
INSTALL doc/ffprobe.1
--- 省略 ---
USB bulk
前面的依赖都安装完毕后,如果只是使用串口(UART),那就可以直接使用了,如果是使用USB,那还需要其他配置。Jetson的系列开发板使用的是l4t对整个USB的模型进行管理。官方给了下面的教程说明:
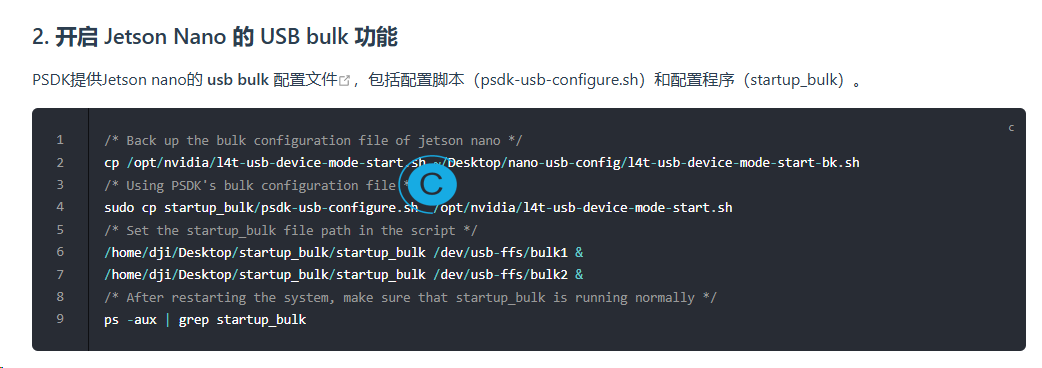
但是因为各个版本均不相同,l4t的目录也和官方说明的不同。
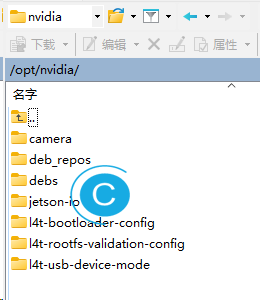
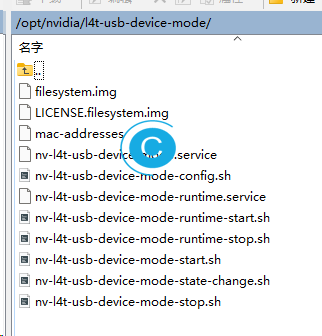
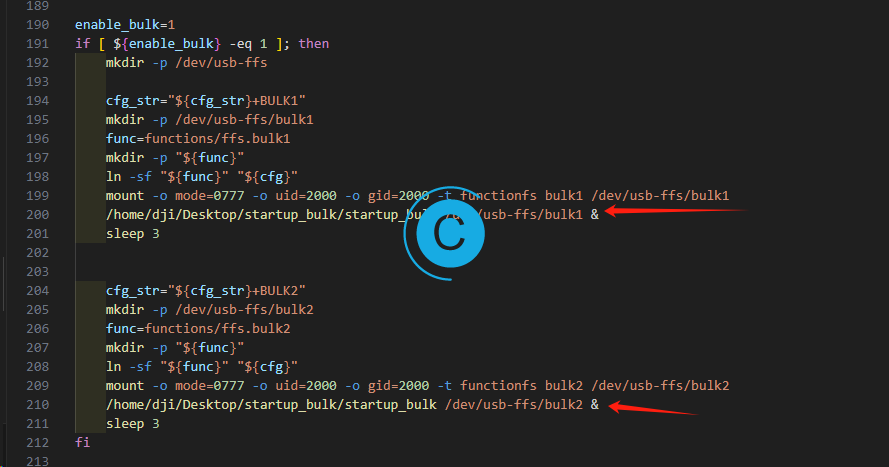
本来我就使用的Jetson Orin Nano,推荐不使用官方提到的usb-bulk-configuration-reference.zip,还是自己改配置编辑比较好。直接使用官方的配置方案会导致rndis等一堆依靠usb的内容出问题。因为配置都在l4t上的。
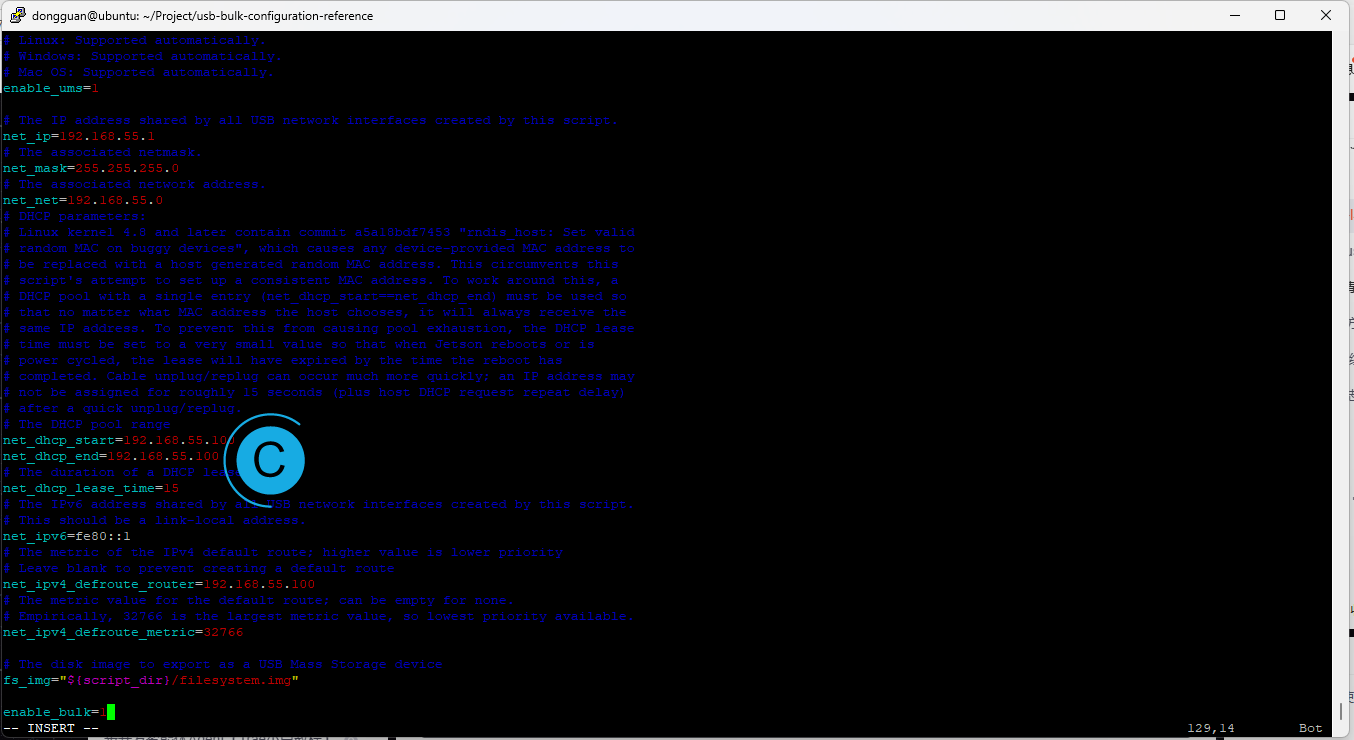

dongguan@ubuntu:~/Project/Payload-SDK-3.11.1$ ls /dev/usb-ffs/bulk2/
ep0  ep1  ep2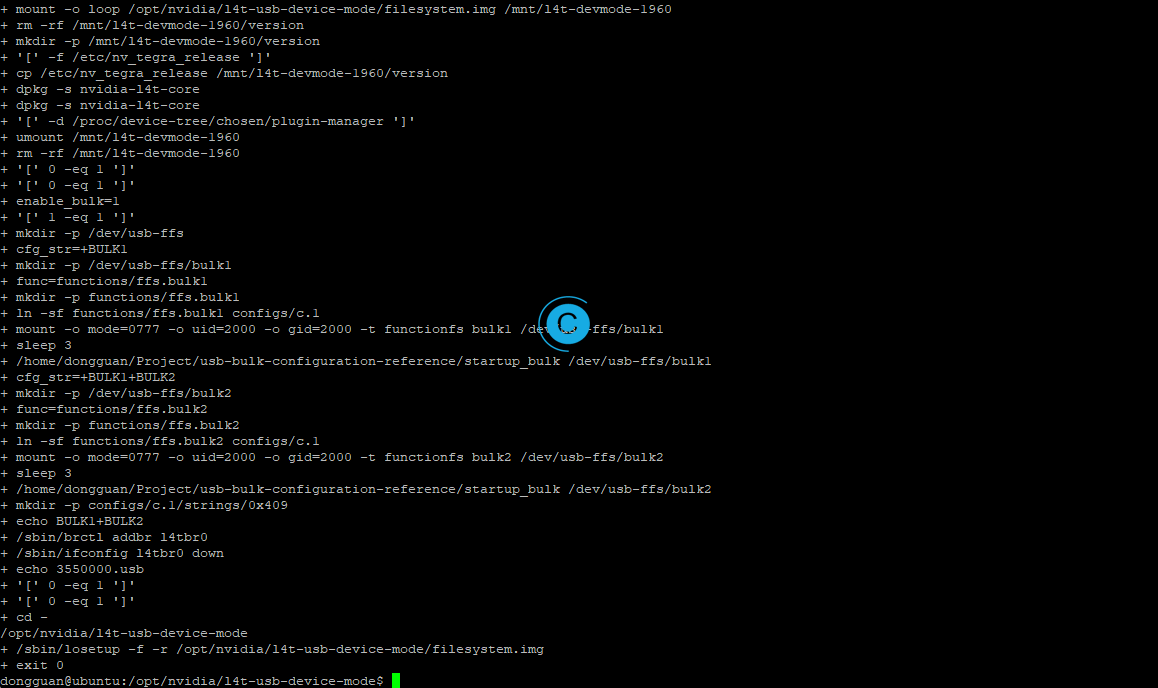
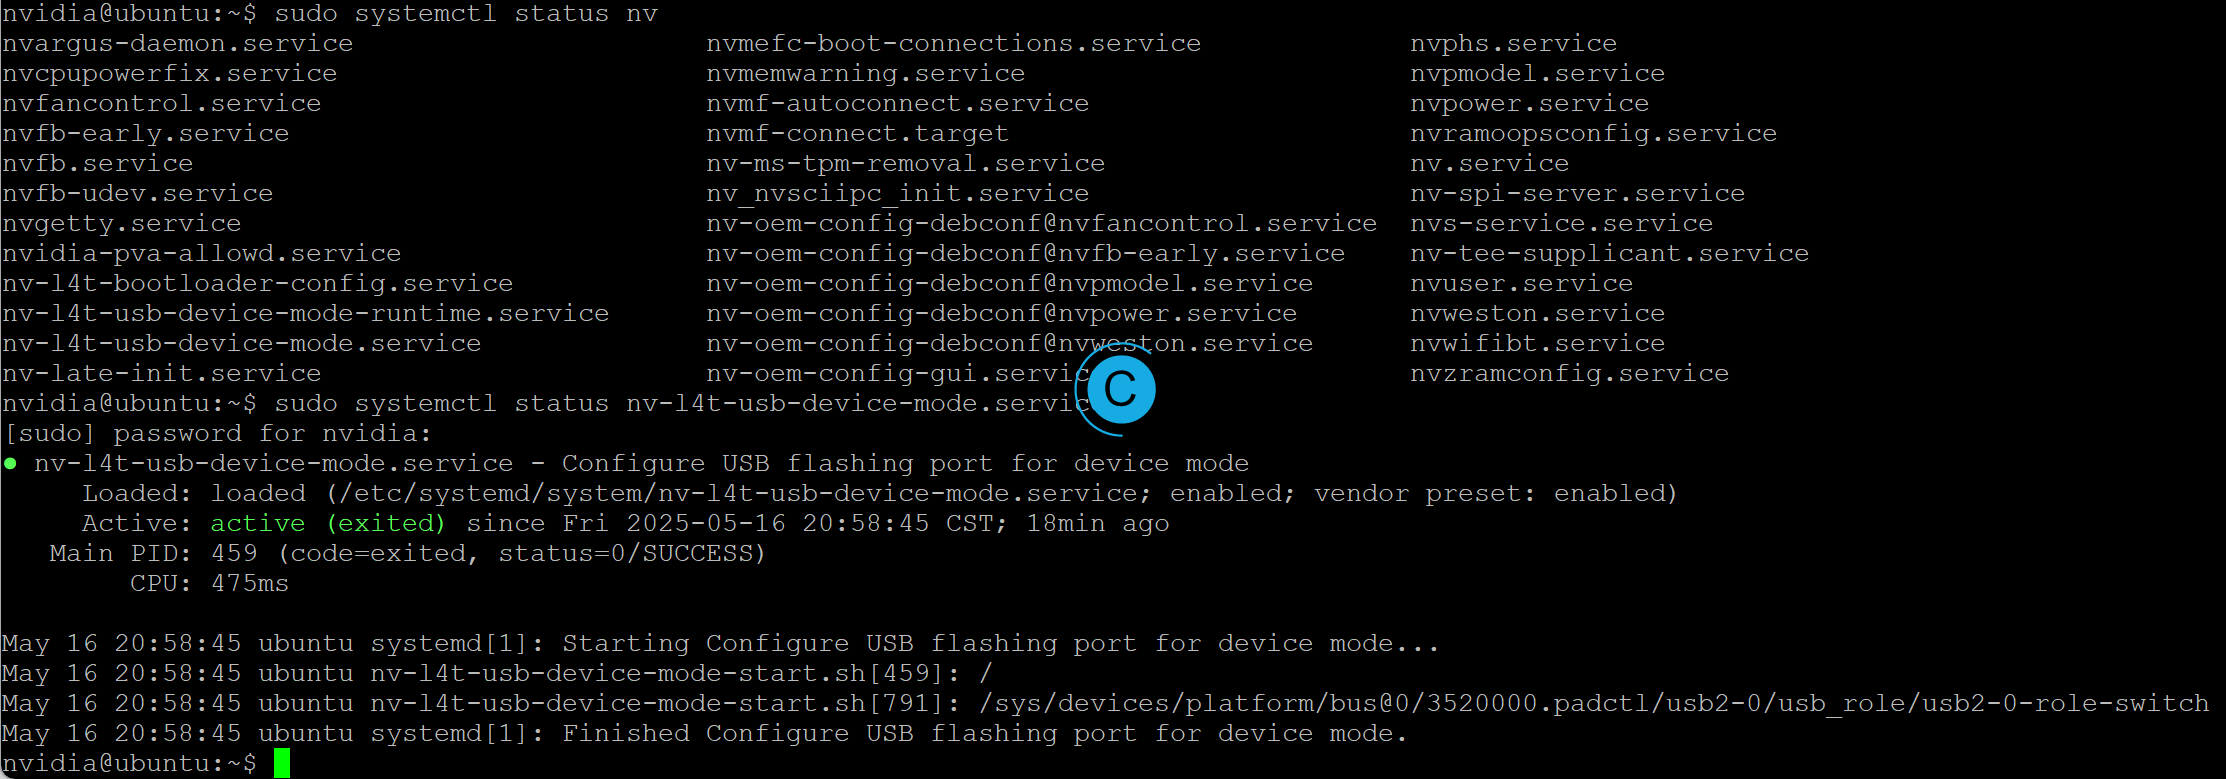
May 16 20:58:45 ubuntu systemd[1]: Starting Configure USB flashing port for device mode...
May 16 20:58:45 ubuntu nv-l4t-usb-device-mode-start.sh[459]: /
May 16 20:58:45 ubuntu nv-l4t-usb-device-mode-start.sh[791]: /sys/devices/platform/bus@0/3520000.padctl/usb2-0/usb_role/usb2-0-role-switch
May 16 20:58:45 ubuntu systemd[1]: Finished Configure USB flashing port for device mode.
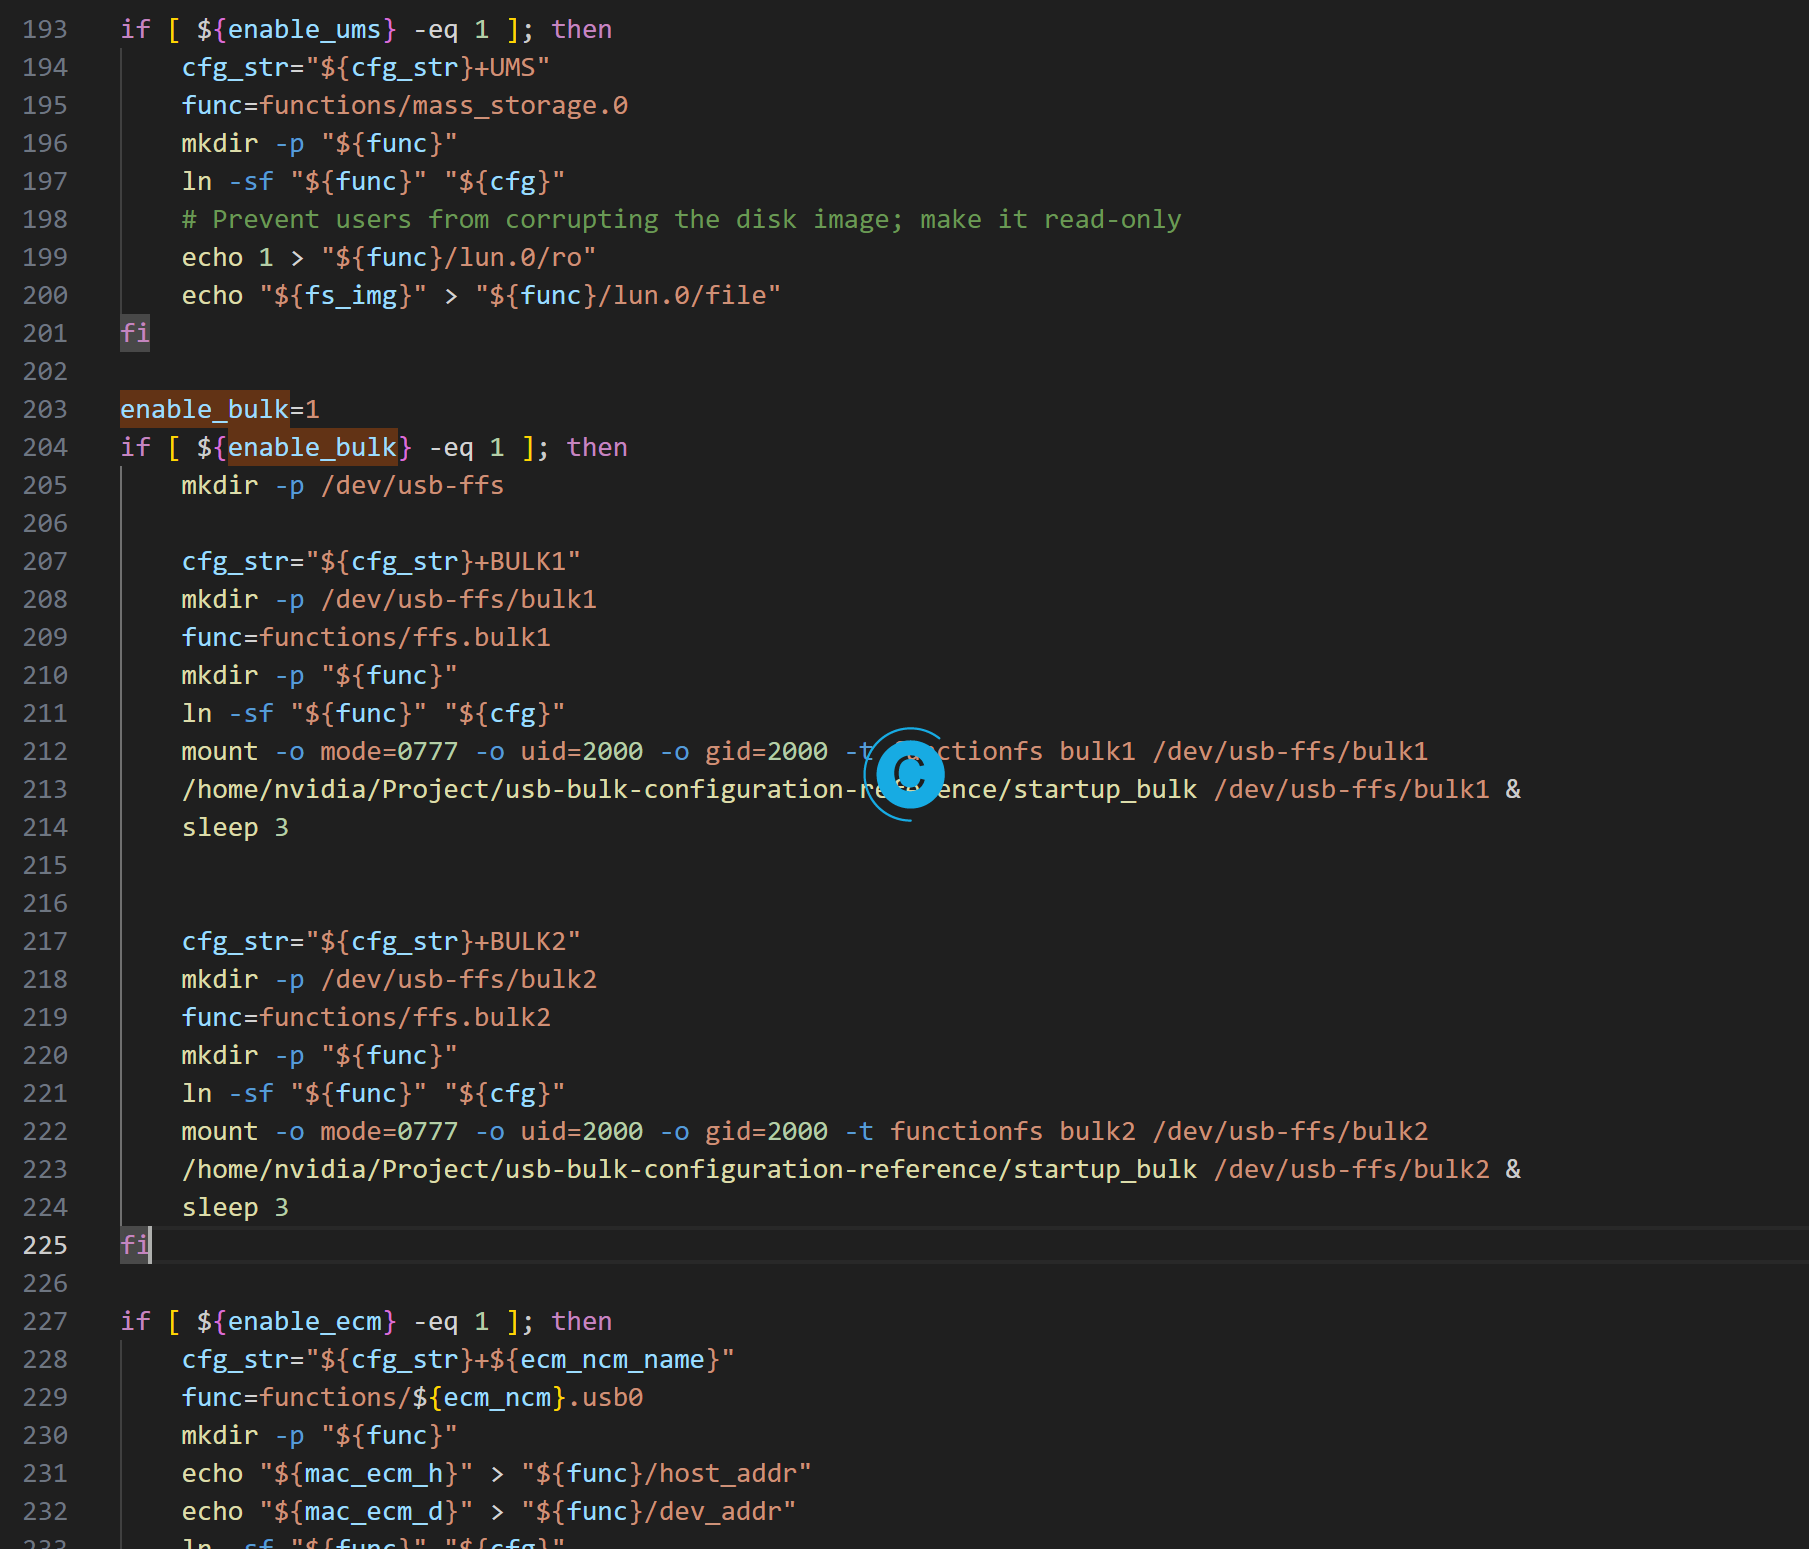
startup_bulk 设置为可执行权限
nvidia@ubuntu:~/Project/usb-bulk-configuration-reference$ sudo cp /opt/nvidia/l4t-usb-device-mode/nv-l4t-usb-device-mode-start.sh /opt/nvidia/l4t-usb-device-mode/nv-l4t-usb-device-mode-start.sh.bak
nvidia@ubuntu:~/Project/usb-bulk-configuration-reference$ sudo cp /opt/nvidia/l4t-usb-device-mode/nv-l4t-usb-device-mode-config.sh /opt/nvidia/l4t-usb-device-mode/nv-l4t-usb-device-mode-config.sh.bak
# 按照文档的话,正常应该直接替换的
sudo cp /home/nvidia/Project/usb-bulk-configuration-reference/psdk-usb-configure.sh  /opt/nvidia/l4t-usb-device-mode/nv-l4t-usb-device-mode-start.sh
# 查看nv-l4t-usb-device-mode运行状态
nvidia@ubuntu:~$ sudo systemctl status nv-l4t-usb-device-mode.service
[sudo] password for nvidia:
● nv-l4t-usb-device-mode.service - Configure USB flashing port for device mode
Loaded: loaded (/etc/systemd/system/nv-l4t-usb-device-mode.service; enabled; vendor preset: enabled)
Active: active (exited) since Sat 2025-05-17 00:04:51 CST; 27s ago
Process: 460 ExecStart=/opt/nvidia/l4t-usb-device-mode/nv-l4t-usb-device-mode-start.sh (code=exited, status=0/SUCCESS)
Main PID: 460 (code=exited, status=0/SUCCESS)
CPU: 475ms
May 17 00:04:50 ubuntu systemd[1]: Starting Configure USB flashing port for device mode...
May 17 00:04:51 ubuntu nv-l4t-usb-device-mode-start.sh[460]: /
May 17 00:04:51 ubuntu nv-l4t-usb-device-mode-start.sh[789]: /sys/devices/platform/bus@0/3520000.padctl/usb2-0/usb_role/usb2-0-role-switch
May 17 00:04:51 ubuntu systemd[1]: Finished Configure USB flashing port for device mode.
nvidia@ubuntu:~$
# 修改后的文件
sudo cp /home/nvidia/Project/usb-bulk-configuration-reference/nv-l4t-usb-device-mode-start.sh /opt/nvidia/l4t-usb-device-mode/nv-l4t-usb-device-mode-start.sh
nvidia@ubuntu:~$ ps -aux | grep startup_bulk
root 698 0.0 0.0 2276 784 ? S 00:09 0:00 /home/nvidia/Project/usb-bulk-configuration-reference/startup_bulk /dev/usb-ffs/bulk1
root 1296 0.0 0.0 2276 788 ? S 00:09 0:00 /home/nvidia/Project/usb-bulk-configuration-reference/startup_bulk /dev/usb-ffs/bulk2
nvidia 1714 0.0 0.0 11708 1988 pts/0 S+ 00:09 0:00 grep --color=auto startup_bulk

jetson的USB插到另外一台电脑上,应该显示USB设备才是配置正确。

允许 usb deivce
因为我的这个底板,usb deivce需要额外做切换。
# 永久生效
sudo sed -i 's#exit 0#echo device > /sys/class/usb_role/usb2-0-role-switch/role\nexit 0#g' /opt/nvidia/l4t-usb-device-mode/nv-l4t-usb-device-mode-start.sh

# 临时生效
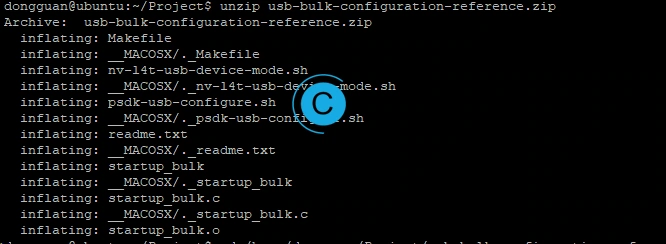
sudo bash -c 'echo device > /sys/class/usb_role/usb2-0-role-switch/role'首先解压usb-bulk-configuration-reference.zip。
Payload-SDK
配置
- samples/sample_c++/platform/linux/nvidia_jetson/application/dji_sdk_app_info.h
#define USER_APP_NAME               "your_app_name"
#define USER_APP_ID                 "your_app_id"
#define USER_APP_KEY                "your_app_key"
#define USER_APP_LICENSE            "your_app_license"
#define USER_DEVELOPER_ACCOUNT      "your_developer_account"
#define USER_BAUD_RATE "460800"USER_DEVELOPER_ACCOUNT:此处的your_developer_account是大疆的开发者账号。
USER_BAUD_RATE:得看无人机的手册,m3td波特率是固定的。
- samples/sample_c++/platform/linux/nvidia_jetson/application/dji_sdk_config.h
#define DJI_USE_ONLY_UART                  (0)
#define DJI_USE_UART_AND_USB_BULK_DEVICE   (1)
#define DJI_USE_UART_AND_NETWORK_DEVICE    (2)
根据实际需求选择。
- samples/sample_c++/platform/linux/nvidia_jetson/hal/hal_usb_bulk.h
USB Bulk端点按照前面配置USB时的参数来。0一般是占用了,1、2,或者2、3。
编译
直接使用cmake即可完成编译,这个没啥问题。
dongguan@ubuntu:~/Project/Payload-SDK-3.11.1/cmake-build-debug$ cmake ../
CMake Deprecation Warning at CMakeLists.txt:1 (cmake_minimum_required):
  Compatibility with CMake < 2.8.12 will be removed from a future version of
  CMake.

  Update the VERSION argument <min> value or use a ...<max> suffix to tell
  CMake that the project does not need compatibility with older versions.


-- The C compiler identification is GNU 11.4.0
-- The CXX compiler identification is GNU 11.4.0
-- Detecting C compiler ABI info
-- Detecting C compiler ABI info - done
-- Check for working C compiler: /usr/bin/cc - skipped
-- Detecting C compile features
-- Detecting C compile features - done
-- Detecting CXX compiler ABI info
-- Detecting CXX compiler ABI info - done
-- Check for working CXX compiler: /usr/bin/c++ - skipped
-- Detecting CXX compile features
-- Detecting CXX compile features - done
-- Found OPUS installed in the system
--  - Includes: /usr/local/include/opus
--  - Libraries: /usr/local/lib/libopus.so
-- Found LIBUSB installed in the system
--  - Includes: /usr/include/libusb-1.0
--  - Libraries: /usr/lib/aarch64-linux-gnu/libusb-1.0.so

dji_sdk_demo_linux_cxx...
-- Found OpenCV installed in the system, will use it to display image in AdvancedSensing APIs
--  - Includes: /usr/include/opencv4
--  - Libraries: opencv_calib3d;opencv_core;opencv_dnn;opencv_features2d;opencv_flann;opencv_highgui;opencv_imgcodecs;opencv_imgproc;opencv_ml;opencv_objdetect;opencv_photo;opencv_stitching;opencv_video;opencv_videoio;opencv_alphamat;opencv_aruco;opencv_barcode;opencv_bgsegm;opencv_bioinspired;opencv_ccalib;opencv_datasets;opencv_dnn_objdetect;opencv_dnn_superres;opencv_dpm;opencv_face;opencv_freetype;opencv_fuzzy;opencv_hdf;opencv_hfs;opencv_img_hash;opencv_intensity_transform;opencv_line_descriptor;opencv_mcc;opencv_optflow;opencv_phase_unwrapping;opencv_plot;opencv_quality;opencv_rapid;opencv_reg;opencv_rgbd;opencv_saliency;opencv_shape;opencv_stereo;opencv_structured_light;opencv_superres;opencv_surface_matching;opencv_text;opencv_tracking;opencv_videostab;opencv_viz;opencv_wechat_qrcode;opencv_ximgproc;opencv_xobjdetect;opencv_xphoto
-- Found FFMPEG installed in the system
--  - Includes: /usr/local/include
--  - Libraries: /usr/local/lib/libavcodec.so;/usr/local/lib/libavformat.so;/usr/local/lib/libavutil.so;/usr/local/lib/libswscale.so;/usr/lib/aarch64-linux-gnu/libz.so
--  - Version:  4.3.2
-- Found OPUS installed in the system
--  - Includes: /usr/local/include/opus
--  - Libraries: /usr/local/lib/libopus.so
-- Found LIBUSB installed in the system
--  - Includes: /usr/include/libusb-1.0
--  - Libraries: /usr/lib/aarch64-linux-gnu/libusb-1.0.so
-- Configuring done
-- Generating done
-- Build files have been written to: /home/dongguan/Project/Payload-SDK-3.11.1/cmake-build-debug
dongguan@ubuntu:~/Project/Payload-SDK-3.11.1/cmake-build-debug$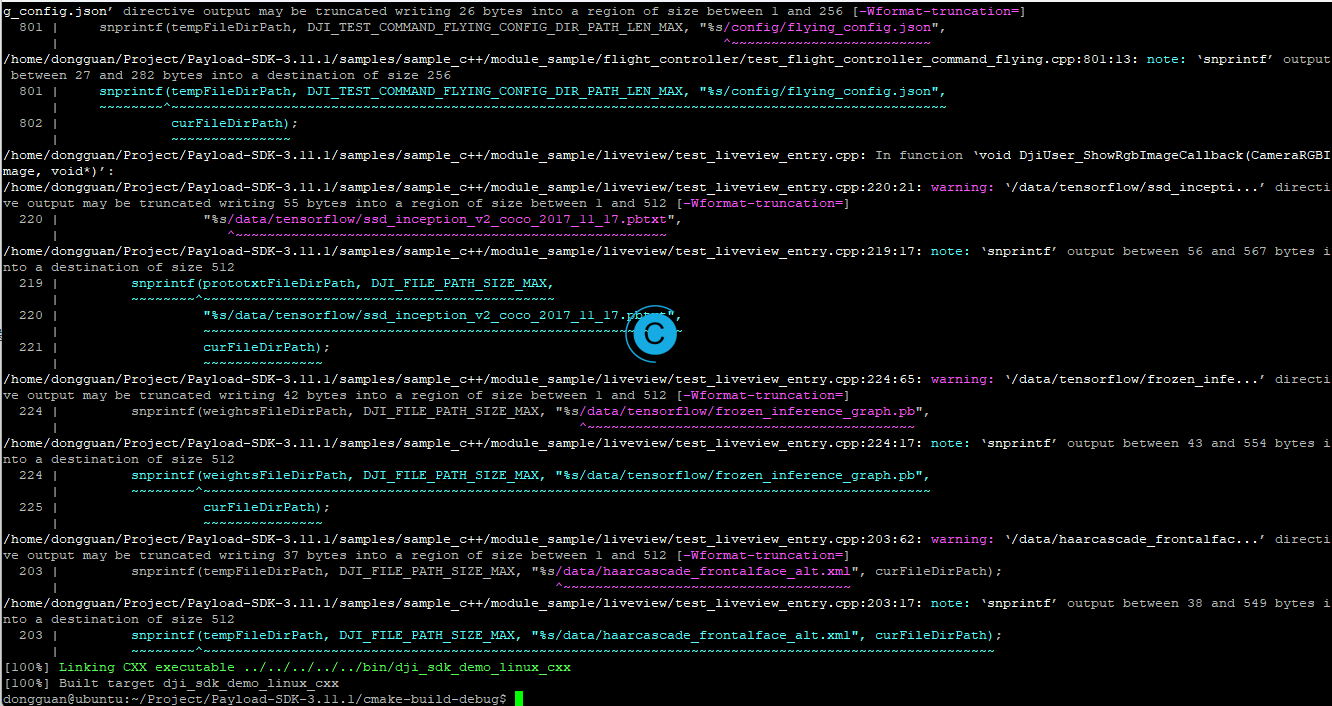
在cmake的配置中看到,默认编译的版本是manifold-2,妙算平台本来就有NVIDlA Jetson TX2核心选择。还是感觉换回jetson好一点,直接按下面的配置新增配置即可。C++版本中冗余的依赖直接屏蔽即可。


dongguan@ubuntu:~/Project/Payload-SDK-3.11.1/cmake-build-debug$ ls ./bin/
dji_sdk_demo_linux dji_sdk_demo_linux_cxx dji_sdk_demo_on_jetson dji_sdk_demo_on_jetson_cxx Logs本作品采用 知识共享署名-相同方式共享 4.0 国际许可协议 进行许可。