创龙T113-i Tina Openwrt增加luci
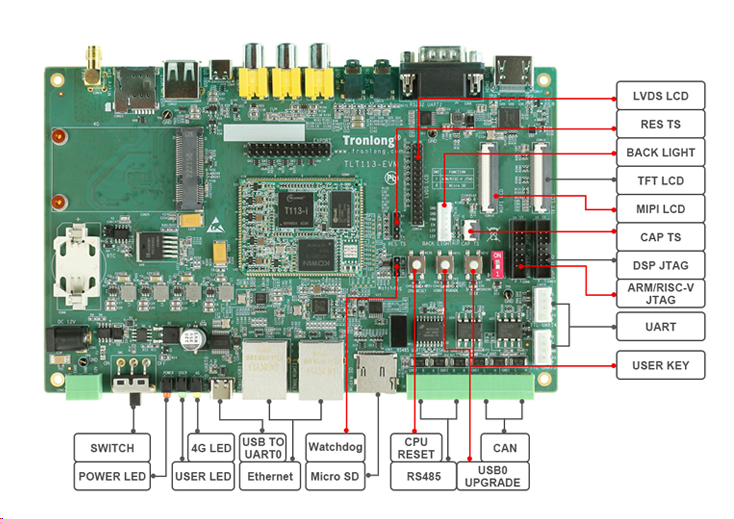
最近入手了一块创龙的T113-i工业评估板-T113-i-Tronlong●创龙科技。双核A7处理器,感觉像是低配的A64,自带1个千兆网口,通过USB扩展了一个百兆网口,那这不又是蛮好的NAS吗?
这次就捣鼓的Tina 5.0系统(全志基于openwrt开发的系统),系统是创龙提供的二次修改版,我也只有创龙提供的资料,并没有全志原厂的资料,所以本文是基于二次修改版的基础上再修改的。

具体的配置参数如下:

这开发板拿到手上的时候觉得确实是蛮精良的,板厚都更厚。
1 增加Luci
默认的Tina是没有Luci的,就是个非常纯净的系统,如果需要的话,自己还得增加一下:
手动执行/home/cyqsd/Project/T113_Tina/.buildconfig文件中的环境配置命令,下面的文件的部分内容:
export LICHEE_PLATFORM=linux
export LICHEE_LINUX_DEV=openwrt
export LICHEE_IC=t113_i
export LICHEE_BOARD=tlt113-evm-emmc
export LICHEE_OUTPUT_CONFIGS=hdmi
export LICHEE_FLASH=default
export LICHEE_ARCH=arm
export LICHEE_KERN_VER=linux-5.4
export LICHEE_KERNEL_VERSION=5.4.61
export LICHEE_KERN_DEFCONF=sun8iw20p1smp_t113_auto_defconfig
export LICHEE_BUILDING_SYSTEM=buildroot
export LICHEE_BR_VER=201902
export LICHEE_BR_DEFCONF=sun8iw20p1_t113_defconfig
export LICHEE_PRODUCT=t113_tlt113-evm-emmc
使用常规Luci安装命令即可:
./scripts/feeds update -a
./scripts/feeds install -a
还需要指定目录的话,查看:
function build_openwrt_rootfs()
{
    local openwrt_rootdir=${LICHEE_TOP_DIR}/openwrt/openwrt

    echo "==mkcmd.sh: build_openwrt_rootfs $@=="
    ${LICHEE_TOP_DIR}/prebuilt/hostbuilt/make4.1/bin/make -C ${openwrt_rootdir} $@

    return $?
}
/home/cyqsd/Project2/build/mkcmd.sh
2 开启详细编译日志
默认的系统编译也是没有输出详细日志的 ,需要在/home/cyqsd/Project/T113_Tina/build/mkcmd.sh中找到:
function build_openwrt_rootfs()
{
    local openwrt_rootdir=${LICHEE_TOP_DIR}/openwrt/openwrt

    echo "==mkcmd.sh: build_openwrt_rootfs $@=="
    ${LICHEE_TOP_DIR}/prebuilt/hostbuilt/make4.1/bin/make -C ${openwrt_rootdir} $@

    return $?
}
修改为:
${LICHEE_TOP_DIR}/prebuilt/hostbuilt/make4.1/bin/make -C ${openwrt_rootdir} -j4 V=s $@编译线程数-j酌情修改。
3 单独配置内核
如果仅需要单独编译openwrt的内核,只需要单独直接进入目录编译即可:
cd out/kernel/build/
make ARCH=arm menuconfig

# 如果你需要手动执行环境配置,使用:
source ./build/envsetup.sh
4 wan不能上网
原厂网络配置文件:
root@T113-Tronlong:~# cat /etc/config/network

config interface 'loopback'
        option device 'lo'
        option proto 'static'
        option ipaddr '127.0.0.1'
        option netmask '255.0.0.0'

config globals 'globals'
        option ula_prefix 'fd88:7a61:ebfb::/48'

config device
        option name 'br-lan'
        option type 'bridge'
        list ports 'eth0'

config interface 'lan'
        option device 'br-lan'
        option proto 'static'
        option ipaddr '192.168.1.1'
        option netmask '255.255.255.0'
        option ip6assign '60'

config interface 'wan'
        option device 'eth1'
        option proto 'dhcp'

config interface 'wan6'
        option device 'eth1'
        option proto 'dhcpv6'

#重启网络
/etc/init.d/network reload
通过iptables可推测内核配置中网络的错误在何处。
root@T113-Tronlong:~# iptables
iptables v1.8.7 (legacy): no command specified
Try `iptables -h' or 'iptables --help' for more information.
root@T113-Tronlong:~# iptables -L
iptables v1.8.7 (legacy): can't initialize iptables table `filter': Table does not exist (do you need to insmod?)
Perhaps iptables or your kernel needs to be upgraded.
然后继续看本文的后面几点。
5 dnsmasq没有自动分配IP
如果是没有分配IP导致的没有网络,那可以检查dnsmasq有没有正常工作:
root@T113-Tronlong:~# netstat -anlp | grep -w LISTEN
tcp        0      0 0.0.0.0:5037            0.0.0.0:*               LISTEN      2192/adbd
tcp        0      0 0.0.0.0:53              0.0.0.0:*               LISTEN      2485/dnsmasq
tcp        0      0 0.0.0.0:22              0.0.0.0:*               LISTEN      3677/dropbear
tcp        0      0 0.0.0.0:7681            0.0.0.0:*               LISTEN      2420/ttyd
tcp        0      0 :::53                   :::*                    LISTEN      2485/dnsmasq
tcp        0      0 :::22                   :::*                    LISTEN      3677/dropbear
如需手动配置IP分配范围,使用vi /etc/dnsmasq.conf。如果ubus比较熟,使用ubus命令也是相同的。
interface=eth0
listen-address=192.168.31.1
dhcp-range=192.168.31.2,192.168.31.255
dhcp-option=3,192.168.31.1
dhcp-option=6,192.168.31.1
dhcp-option=42,192.168.31.1
6 配置Netfilter
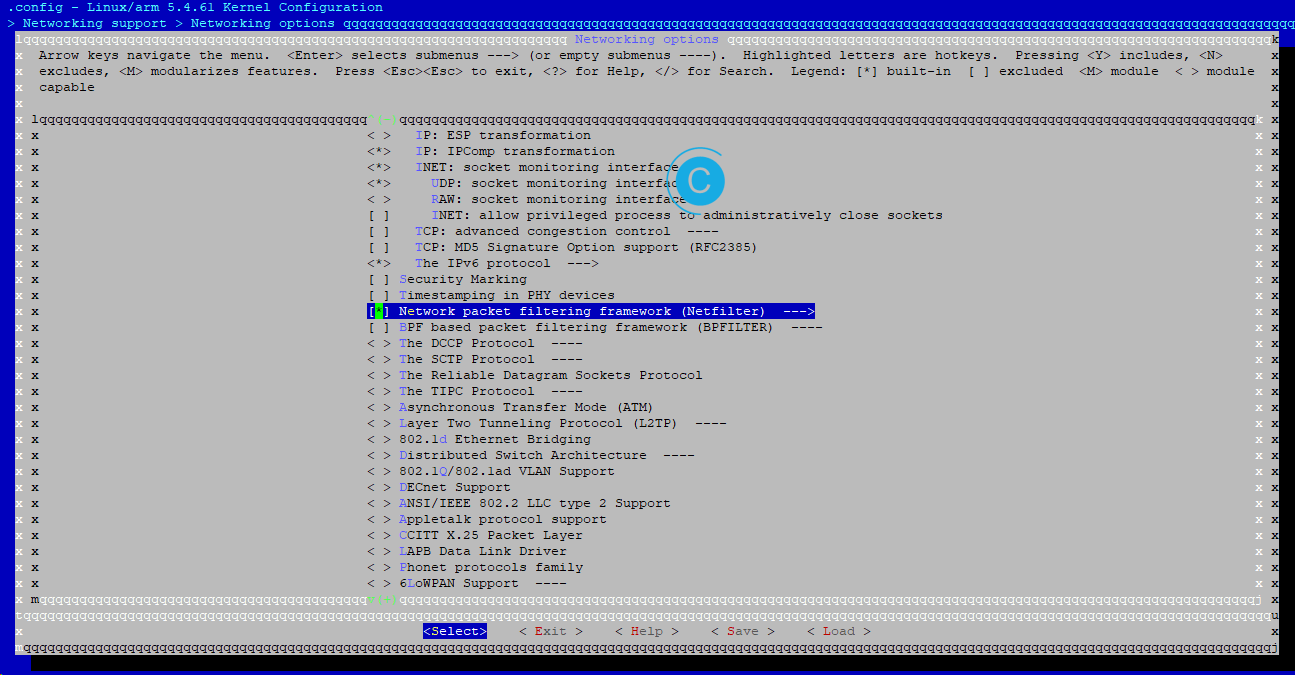
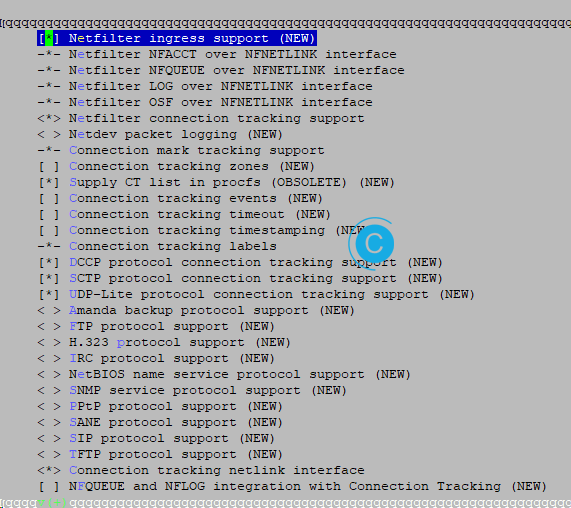
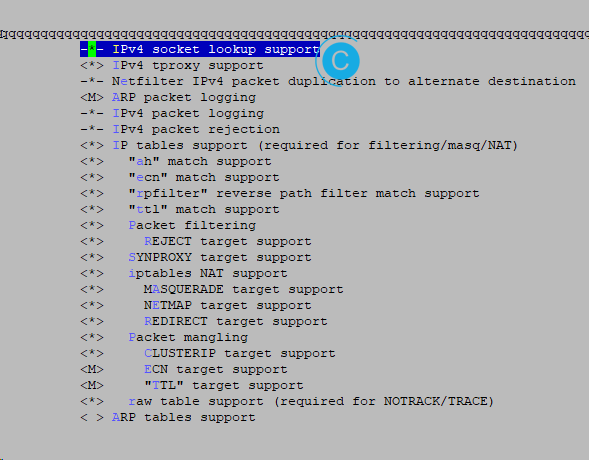
如果无法上网,特别是无法从LAN->WAN,那么得根据前文中的iptables报错信息看,是不是Netfilter相关的内核配置项没有打开,没有的话就需要开启Netfilter。

其中 Netfilter Xtables support (required for ip_tables)中的项目酌情全部开启。

然后再打开IP: Netfilter Configuration中的配置项,如下图:

> Networking support > Networking options中
802.1d Ethernet Bridging开启。
其他选项酌情开启,如果有问题,可以参考RK3568内核配置Docker支持 - cyqsd's blog中内核配置项。
7 modules目录中找不到source
#编译中遇到,没有source
/lib/modules/5.4.0-150-generic/source

#需要先检查
sudo apt-get install linux-headers-$(uname -r)

#进入目录执行
ln -s "/home/cyqsd/Project/T113_Tina/kernel/linux-5.4" "source"
经过前文的一通操作后,openwrt的路由相关功能已经可以正常操作了,单纯的基于平台做开发是没有问题的了,但是web界面依旧不可用,还需要再修改,就等以后有空再捣鼓了。
本作品采用 知识共享署名-相同方式共享 4.0 国际许可协议 进行许可。